As many of us know, some of those games of the 8-bit era take a very large toll on the most common implement used to control them: the joystick. Yes, some of them just aren’t made to last (Mr Cheetah Annihilator, with your poorly designed plastic shaft, I am looking at you!), but even the most rugged of joysticks (Zipstick, anyone?) can get creaky and inaccurate after wrangling through the pixel perfect jumps of Manic Miner one too many times.
This is why, after reading an article in Reset magazine issue 5 (Reset is a free downloadable Commodore 64 magazine that I highly recommend for C64 fans! reset.cbm8bit.com) describing how to build a Zipstick-style joystick out of readily available parts, I decided to give it a go myself. I am very proud of the results!

As much as it pains me to use eBay sometimes (we all know how atrocious it can be for it’s outrageously priced retro goods), it is a very useful source for finding DIY bits and bobs, electronics and materials for home projects. I managed to find every part I needed on there, and if you look hard enough, you can find items with downloadable PDF diagrams containing all of it’s dimensions (which is massively helpful in the planning stages when you’re not entirely sure how the thing is going to look yet!)
Planning is an important stage, even if it’s just a rough sketch of where the stick will be and the button layout, it has to be done. Ignore this stage at your own risk! You may end up with something that looks like this:

Interesting!
I managed to find an ‘outdoor waterproof circuit box’ which was an ideal shape and size for the arcade / fight-stick style layout I was aiming for. Having the dimensions straight away from a PDF saved some number of hours, as I was able to draw the box life-size on squared paper and try out different layouts of the stick and buttons before I even had it.

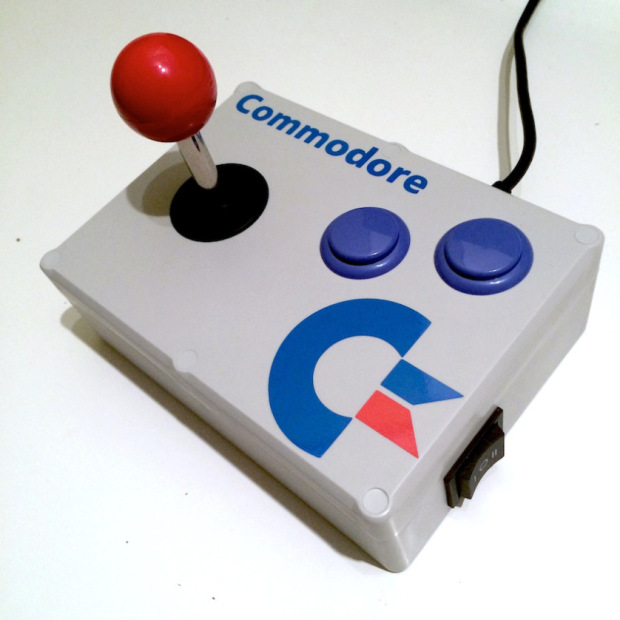
Incidentally, it was the grey (almost) Commodore-like colour of the box that gave me the idea of the Commodore colour scheme, and upon searching for ‘Commodore decal’ online, I came up trumps with the perfect match for my project.
Once the housing had arrived, it really became quite an exciting project! At least, for a Commodore enthusiast like myself anyway:

I managed to find a seller that supplied a ‘budget option’ for buying arcade buttons and sticks together. Some arcade quality parts can cost an absolute fortune, so to find a bundle of the buttons and stick together at a decent price was quite a relief.
Arcade sticks are very often attached underneath the surface of the panel by four screws, which are then covered up by a round plastic dust cover. My budget arcade stick did not allow for this, so I instead decided to make a wooden frame which would sit inside the project box, and attach to the bottom half, rather than the top panel. This actually made it feel very solid, and gave the whole thing a nice weighting.

A very helpful tip that I picked up from the article in Reset magazine, was to cover the work-in-progress areas of the project with masking tape, which both aids with marking measurements, and protects the surface area from any scratches whilst working with tools.

And here are my favoured tools for making arcade button and stick sized holes:


Vicious! The drill bit (sourced from B&Q a few years ago when putting together another arcade related project) makes a hole which is just under the size of a standard arcade button, and then the round files can be used to finish the job nicely.
Handily, any rough edges or imperfections get hidden by the lip of the buttons and the stick’s dust cover.

Next, a hole needs to be made for the cable to pass through. I also decided to add a switch to the side of the arcade stick, so I could change the function of the second button.
This is particularly useful for platform games, where the game would normally need you to press ‘up’ on the joystick to jump, it’s a lot easier to just press a button. Also, some of the cartridge games that were made for the doomed C64GS console made use of the joystick ports analogue input pins as a secondary fire button function, so I added this to the switch also.


Using this kind of switch means I can turn the button off, as well as choose between the two functions.
It is possible to make a suitable cable from individual parts for the joystick. All that is needed is some multi-core cable, a 9 pin D-Sub plug and some heat shrink. However, to save time (and a small amount of money) I used the cable from a broken Mega Drive pad that I had in my retro goods store (also known as ‘The Loft’).
Using a multi-meter and my faithful companion‚ ‘The Commodore 64 Programmer’s Reference Guide’, I identified which pins of the cable were connected to each coloured wire, and made a note of them.
I cannot recommend this book highly enough! It tells you pretty much everything you could ever want to know about the C64, like the use of each memory register, every assembly command for the 6502 and the pin outs for each port.
Good stuff!!


Once all of the wires from the cable had been identified, I fitted some terminals to the inside of the project box and labelled their functions. This will come in very handy if anything should ever break and need replacing, rather than having to unsolder or cut wires, the terminals can just be unscrewed so the parts can easily be replaced.

Connecting everything up is fairly straight forward, each micro-switch needs a connection to the correct terminal for that function and a connection to ground. One thing to bear in mind with the micro-switches for the stick, is that when you push the stick in a direction, it activates the micro-switch on the opposite side of the stick!

Once all the wires are in place, now is probably a good time to test before the lid is screwed on. Make sure you choose a game that can test every function!
Once testing is complete, final assembly can begin.
This is where the one and only problem I had with this project became apparent: the buttons I had chosen (I chose the longer screw-in type) were only just the right size to fit inside the box, but with the microswitches inserted into the end of the button, they were about 5mm too long.
I had to then search around for some blue clip-in type buttons, which are a lot shallower. Unfortunately I couldn’t find an exact shade of blue to match my decals like the other ones did, but the ease of replacing them means I can always switch them out if I do find some in the future.
The project box I chose had six screws in the top of the lid to fix it down, which concerned me initially (for aesthetic reasons) until I discovered it came with some round plastic covers to hide the holes.
The decals really finish the arcade stick off nicely. Luckily they were available in red and blue, so I was able to mix and match them to get the correct logo colours.

I have to say, I‚’m really pleased not only with the way it looks, but also the way it handles. It has a nice weight to it, and it’s a really nice change not to have to put up with using a clunky old joystick.
The secondary button function is also a massive help with platform games, and definitely gives them a ‘console’ feel which is most welcome.
No more creaky old joysticks for me! That honour now falls to player 2.
Original post can be found at Retro Games Collector
Build your own Commodore 64 arcade stick – a guide