So you have got your old Spectrum+ out from the loft because you don’t like the look of that ‘orrible thing called the Vega. You plug it in but alas, some or all of the keys don’t work. Well, the keyboard membrane has failed but don’t go binning your 80s pride and joy just yet – all is not lost and you will get to explore the Jet Set Willy mansion once more…
Keyboard membrane failure was and still is probably the most common issue to arise from the use of an original Spectrum + and it can be remedied for approximately £16 and 20 minutes of your time.
Disclaimer: I take no responsibility for any damage you do to yourself or your Spectrum during this process. You proceed at your own (and your Spectrum’s) risk!
What you will need:
A crosshead screwdriver
A new ZX Spectrum keyboard membrane (available from either www.sellmyretro.com or www.dataserveretro.co.uk) ensuring it is for the Spectrum+ 48K/128K.
Step 1: Dissassembly
A.

B.

C.

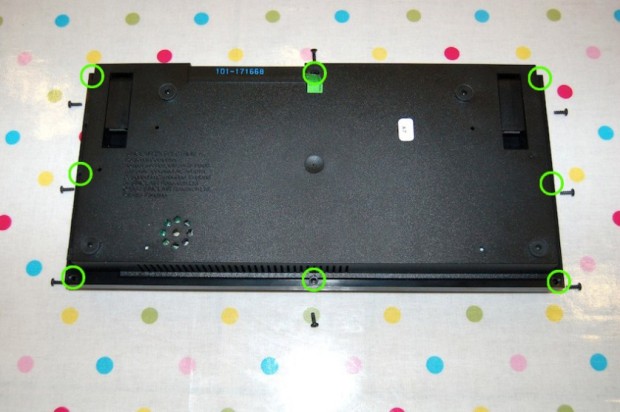
Turn your Spectrum over to expose the screws that hold your Spectrum together (8 altogether – see pic A). Take all of the screws out and carefully put them to one side. There should be one countersunk screw on the Spectrum+ next to the I/O interface port with the rest being round headed screws. Make a mental note of where the countersunk screw goes for re-assembly later on.
Carefully turn your Spectrum right way up bearing in mind the top case is now loose and you still have ribbon connectors attached to the bottom case (pic B). Lift the top case up enough to prise the 2 keyboard ribbon connectors out of their sockets (pic C). The ribbon connectors are notoriously brittle when old so be sure to hold the ribbon as close to the socket as possible and gently but firmly pull upward and out of the sockets.
You can now put the bottom casing to one side.
Step 2: Removing the old membrane
D.

E.

With the top casing keyboard down, remove the 10 screws indicated in pic D and put to one side. Remove the metal plate and the plastic sheet underneath exposing the soon-to-be-replaced keyboard membrane (pic E).
F.

G.

Now unscrew and remove the two ribbon clamps that hold the ribbon connectors in place and put the clamps to one side (pics F and G). Remove the old membrane exposing the rubber mat underneath. If you like, you can now take this opportunity to remove the rubber mat and suck away its 30 year build up of dust, fluff, food and dead skin with a vacuum cleaner brush attachment. Ewww.
Step 3: Inserting the new membrane
H.

I.

To enable correct alignment of the rubber mat and new membrane you must let the keys to fall into position uninhibited i.e. not in a depressed position. I used another two Spectrums for this but anything will do, a couple of thick books or blocks of wood for instance. Place these either side of the Spectrum’s keyboard (but not across it). This lets the keys and rubber mat drop into place and the two small holes in the mat and membrane (circled in pic H and I) will then align correctly on the positioning pins (pin shown in pic I). Once you have ensured the rubber mat is located correctly, insert the new membrane aligning the positioning pins through the holes as described, keeping your Spectrum in this raised position.
J.

K.

Whilst still in the raised position, place the plastic sheet and then the metal plate on top of the membrane ensuring that the positioning pins are located in their respective holes as with the mat and membrane (pics J and K).
L.

M.

Once everything is in place, replace the 10 screws securing the metal plate (pic L). If everything is aligned correctly the screws should locate easily. With the flap from the rubber mat underneath, now position the ribbons and replace the 2 ribbon clamps ensuring that the membrane is not pulled too tight (pic M).
Step 4: Re-assembly
N.

Now re-assemble your Speccy making sure you push the ribbon connectors on your brand new membrane back into their sockets firmly but carefully (pic N). The rest is just Step 1 in reverse, but make sure you reinsert the 2 feet and plastic springs before re-assembling the case, they have likely become displaced.
Well done. If you haven’t already done so, consider future proofing your Spectrum further with a simple composite mod, enabling your vintage computer to be used on modern TVs with composite input.
Original post can be found at Retro Games Collector
ZX Spectrum + keyboard membrane replacement – how to